Truck camper securement 101
What Is a TorkLift Camper Tie Down?
Learn what a TorkLift frame-mounted tie down does, how it works with turnbuckles and which pieces make up a complete truck camper securement system.
The short answer
A truck-side anchor point for the camper securement system
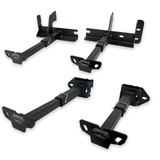
A TorkLift camper tie down is vehicle-specific hardware installed at the truck frame. It creates an external attachment point near each corner of the truck bed so turnbuckles can connect the camper to the truck.
In one sentence: the tie down anchors to the truck, while the turnbuckle connects that anchor to the camper.
- Front and rear applications are selected separately for the truck.
- The removable inserts provide the exposed connection points.
- Spring-loaded turnbuckles complete the connection to the camper anchors.
Follow the connection
Where each part sits
- 1Camper anchor point
- 2Spring-loaded turnbuckle
- 3Removable tie down insert
- 4Frame-mounted receiver
- 5Truck frame
The tie down is the truck-side hardware. The turnbuckle bridges the space between the tie down insert and the camper anchor point.
Know the pieces
Four elements create the complete connection
Product names can sound interchangeable, but each component has a different job. Understanding the pieces makes it easier to compare listings and avoid an incomplete order.
Frame receiver
The vehicle-specific bracket is installed at the truck frame according to the instructions for that exact application.
Removable insert
The insert slides into the receiver and provides the attachment point outside the truck body. It can be removed when the camper is off the truck.
Turnbuckle
A spring-loaded turnbuckle connects a camper anchor to a tie down insert and is adjusted according to the current manufacturer instructions.
Front and rear pairs
A complete four-point setup normally combines the correct front pair, rear pair and four compatible turnbuckle connections.
Tie downs and turnbuckles are different products
A listing may include only a front pair or only a rear pair, and turnbuckles are commonly sold separately. Check the included positions and quantity before ordering.
The load path
Two connections shown; a complete setup uses four
How it works
From mounted hardware to a travel-ready connection
The exact installation and adjustment procedure depends on the part numbers, truck and camper. The basic sequence remains easy to understand.
- 1
Install the receivers
Fit the correct front and rear brackets using the hardware and procedure specified for the exact truck application.
- 2
Add the removable inserts
Slide each insert into its receiver, confirm orientation and secure it exactly as shown in the product instructions.
- 3
Connect the turnbuckles
Join each camper anchor point to the corresponding tie down insert with a compatible spring-loaded turnbuckle.
- 4
Adjust and inspect
Set tension using the current turnbuckle and camper instructions, then verify the hardware before travel and during routine inspections.
Why frame-mounted is different
Compare the attachment approach, not just the product name
Frame-mounted and bed- or bumper-mounted systems route forces through different parts of the truck. The correct choice must also meet the requirements of the truck and camper manufacturers.
| Detail | TorkLift frame-mounted | Bed- or bumper-mounted approach |
|---|---|---|
| Connection path | The receiver is installed at the truck frame and supports a removable external insert. | The connection uses bed, bumper or other system-specific mounting hardware. |
| Fitment method | Front and rear part numbers are matched to the exact truck, including configuration details that can affect installation. | Requirements and compatibility depend on the design of the selected system and vehicle. |
| When unloaded | The exposed inserts can be removed; the receivers remain tucked beneath the truck. | Visible hardware and removal options vary by system. |
| Typical shopping list | Correct front pair, correct rear pair and compatible spring-loaded turnbuckles. | Components and quantities vary; follow that system's complete installation list. |
Material options
Standard steel or Talon
Both versions serve the same frame-mounted purpose. Availability and exact construction depend on the application, so compare the matching part numbers rather than choosing by material alone.
Standard option
Steel tie downs
The familiar steel version provides the application-specific receiver and removable-insert layout for supported trucks.
- Match front and rear applications separately
- Follow the care instructions for the listed finish
Premium material option
Talon tie downs
Talon versions use stainless steel and aluminum components to reduce weight and improve long-term corrosion resistance.
- Same vehicle-specific fitment process
- Check Talon availability for both positions
Fitment comes next
A tie down is not universal, even when the truck model matches
Model year is only the starting point. Cab, bed, running boards, wheel configuration and receiver hitch can change the required front or rear application.
Have these truck details ready
- Year, make and model
- Cab configuration
- Exact bed length
- Running boards or steps
- Receiver hitch type
- SRW or DRW
Install with the instructions
Three checks matter after choosing the parts
Use the exact manuals
Follow the instructions for the specific front, rear and turnbuckle part numbers, plus all truck and camper manufacturer requirements.
Set specified tension
Use compatible spring-loaded turnbuckles and the current adjustment method. Do not guess or substitute a rigid connection.
Inspect before travel
Confirm pins, fasteners, inserts and turnbuckle connections are secure, then follow the recommended inspection schedule.
This overview explains the system; it does not replace application-specific installation instructions or the loading and securement requirements for your truck and camper.
Common questions
TorkLift tie down FAQ
Clear answers to the questions that usually come up before selecting a system.
Is a camper tie down the same as a turnbuckle?
No. The tie down is the truck-side mounting hardware and removable insert. The turnbuckle is the adjustable connection between that insert and the camper anchor point.
How many TorkLift tie downs do I need?
A complete four-point setup normally uses a front pair and a rear pair. Each point is then connected to the camper with a compatible turnbuckle. Verify the contents of every listing because pairs and complete sets are labeled differently.
Are TorkLift camper tie downs universal?
No. They are matched to specific truck configurations. The year, model, cab, bed, running boards, hitch and wheel configuration can affect the required front or rear part number.
Can the tie downs be removed when the camper is off?
The exposed tie down inserts are removable on the frame-mounted system. The installed receiver brackets remain tucked beneath the truck.
Do all applications install without drilling?
Many applications use existing mounting locations, but installation details vary. Check the current instructions for the exact part number and never assume one truck installs like another.
Can I install TorkLift tie downs myself?
Some owners complete the application-specific installation themselves. If you lack the required tools, cannot verify fitment or are unsure about any step, use a qualified installer.
Continue from the basics
Your next useful step
Before you order
Confirm your application with TorkLift
Use the manufacturer’s official Fit Finder to confirm the front and rear part numbers for your exact truck configuration. If a result is unclear, ask TorkLift before placing an order.